Expression Limits

Some performers push a control further than the character should ever go. Expression Limits caps that per character instead of per take: a profile asset holds a floor, a knee and a ceiling for each expression, you dial it against a solved take and watch the face follow, and every export of every job that names the profile comes out limited. The solved Performance on disk is never touched.

Open the panel

Open a solved Performance asset and click Expression Limits in its toolbar. With no profile set, New from Take creates one next to the Performance, named CLP_<Performance>, with one unlimited row per expression the take carries. The profile is an ordinary asset: keep it per character and point every job for that character at it.

The Expression Limits tab docked beside the Performance viewport: face control board on top, one slider row per limited control below, the preview face following as a ceiling is dragged
Dialling a limit against a solved take - the viewport follows the slider
Control What it does
Profile Which profile is live on this Performance. The choice is per editor session, not saved into the asset.
Enabled Untick to see the raw solve for comparison. Batch exports ignore this switch.
Curves Advanced. Swaps the default one-row-per-board-control view for one row per raw expression curve.
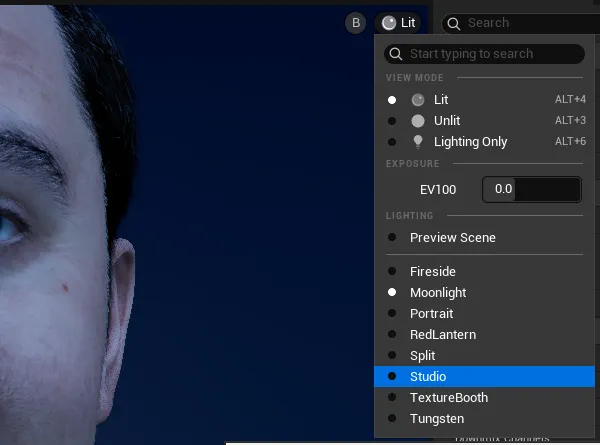
Lighting In the Performance editor viewport's View menu, in its own Lighting section after Exposure, not this panel. Lights the viewport with one of Epic's MetaHuman rigs (Portrait by default), a Custom Light Preset registered in MetaHuman Character, or a level from your own lighting folder. The rig's map is streamed into the preview world and unloaded again on switch, so a World Partition level is refused. Remembered for every Performance you open; nothing is written into the asset.
Hair Puts the grooms of the MetaHuman whose face mesh the viewport is showing onto the preview face. The character is found from that face mesh, so there is nothing to pick. Remembered like Lighting; nothing is written into the asset.
Schematic The real face control board. Knobs sit at the current frame's solved value, red bars mark where each limit cuts the travel. Click a control to add it as a row, drag to move its ceiling, wheel to zoom, right or middle drag to pan.
Rows One slider per limited control, with Min / Mid / Max spin boxes, the take's own peak, and a tick at the current frame. Filter by name, or use Add curve.
The Lighting section of the Performance viewport's View menu, listing Preview Scene and Epic's rigs with Moonlight active
Picking a rig from the Lighting section of the viewport View menu; the rig's map streams into the preview world on switch

What a limit does

Three handles per row. Mid is the knee and the one input that passes through untouched. Above it the response is scaled so full input lands exactly on Max; below it the same scaling runs the other way and zero input lands on Min. The output never leaves Min..Max, and the curve keeps its shape at both ends rather than flattening into a plateau. Defaults of 0 / 0.5 / 1 are a no-op.

Rows are ordered 0 <= Min < Mid < Max <= 1. Dragging one handle past another pushes it rather than swapping the two, so a row can never be inverted.

Control rows and curve rows are different units. A board control row spans the control's own range, so a two-sided axis such as blink / widen rests at 0.5: its floor limits one expression, its ceiling the other, and the knee couples both halves. A curve row limits one raw curve over 0..1. Both lists stay live whichever view is showing; control rows apply first.

Live in the Performance editor

Moving a handle rebakes the take's face animation in place: Sequencer keys, the Control Rig tab and the viewport all follow. Long takes rebake on a short delay after you let go rather than on every pixel of a drag.

The asset on disk stays raw. Limits live in memory only: they are pulled out before the package saves and put back afterwards, and a re-solve re-applies them. Epic's own Export Animation from inside the editor exports the limited curves and stamps the result so it is never limited a second time on playback.

In a batch

Set Curve Limit Profile in a job's Export options, on a Solve Defaults template, or per take. Every export that job writes - AnimSequence, Level Sequence Control Rig bake, and FBX - comes out limited; leaving it empty means no limits. The frames are limited for the length of the export and restored afterwards, so Re-Export with an edited profile regenerates every output without re-solving.

Each job logs what its limits actually did: per curve, the take's own peak, what that peak became, and the share of frames that changed. The same report rides in the saved manifest. A limit that reports no affected frames is a limit that was never reached.

A Performance open in the editor with a profile live steps aside for the length of a batch export, so a queued job always exports from the raw solve and never limits twice.

Limits on a character, outside a take

Right-click the profile asset in the Content Browser:

Action What it does
Preview Curve Limits Plays the profile's range-of-motion animation on its preview face mesh with the limits inserted, so you can judge them without a take.
Apply to Character... Points a face mesh at a limited copy of its post-process AnimBlueprint, so everything that character plays back in the editor is limited.
Remove from Characters Restores every mesh the profile was applied to, exactly as it was.
Apply to Character blocks cooking. The limited AnimBlueprint is editor-only workflow content, so an applied mesh will not cook until Remove from Characters is run. The confirmation dialog says so before it changes anything.